
What Size Should You Cut Quilting Scraps?
A Simple System That Keeps Your Stash Under Control
New here? This article is part of the The Usable Scrap Method — a step-by-step approach to cutting, organizing, and confidently sewing from your stash.
When I first started quilting, I didn’t realize scraps would become their own category of overwhelm. One project turned into leftovers… leftovers turned into piles… and before long I had a fabric mountain quietly judging me from the corner of my sewing room.
I tried sorting by color (beautiful, but impractical). I cut random sizes (confusing). I ignored them (not recommended).
What I didn’t need was more storage — I needed a simple decision-free process.
That’s exactly why I created The Usable Scrap Method — a streamlined way to cut, store, and actually use your scraps so they stop becoming clutter and start becoming future quilts.

Growing mountain of scraps
Step One: Standardize (The Heart of the Usable Scrap Method)
After years of trial and error, I found a system that actually works—inspired by the wonderful Karen Brown of Just Get it Done Quilts and tweaked to fit my "modern traditional" soul.
The secret to the Seamingly Simple Usable Scrap Method is this: remove the decisions before they ever reach your cutting table.
Don't worry about saving every single thread. If it’s smaller than 1", let it go (unless you like crumbs then save these in their own bin).
The Fussy Cut Exception
Before you slice, look for "personality"—cute animals, bold florals, or geometric centers. Do not cut these down. Keep these special scraps in their original "ugly" shapes to give yourself the most flexibility later. Store them in a dedicated bin organized by color for a quick burst of inspiration whenever you need that perfect "pop" for a block center.
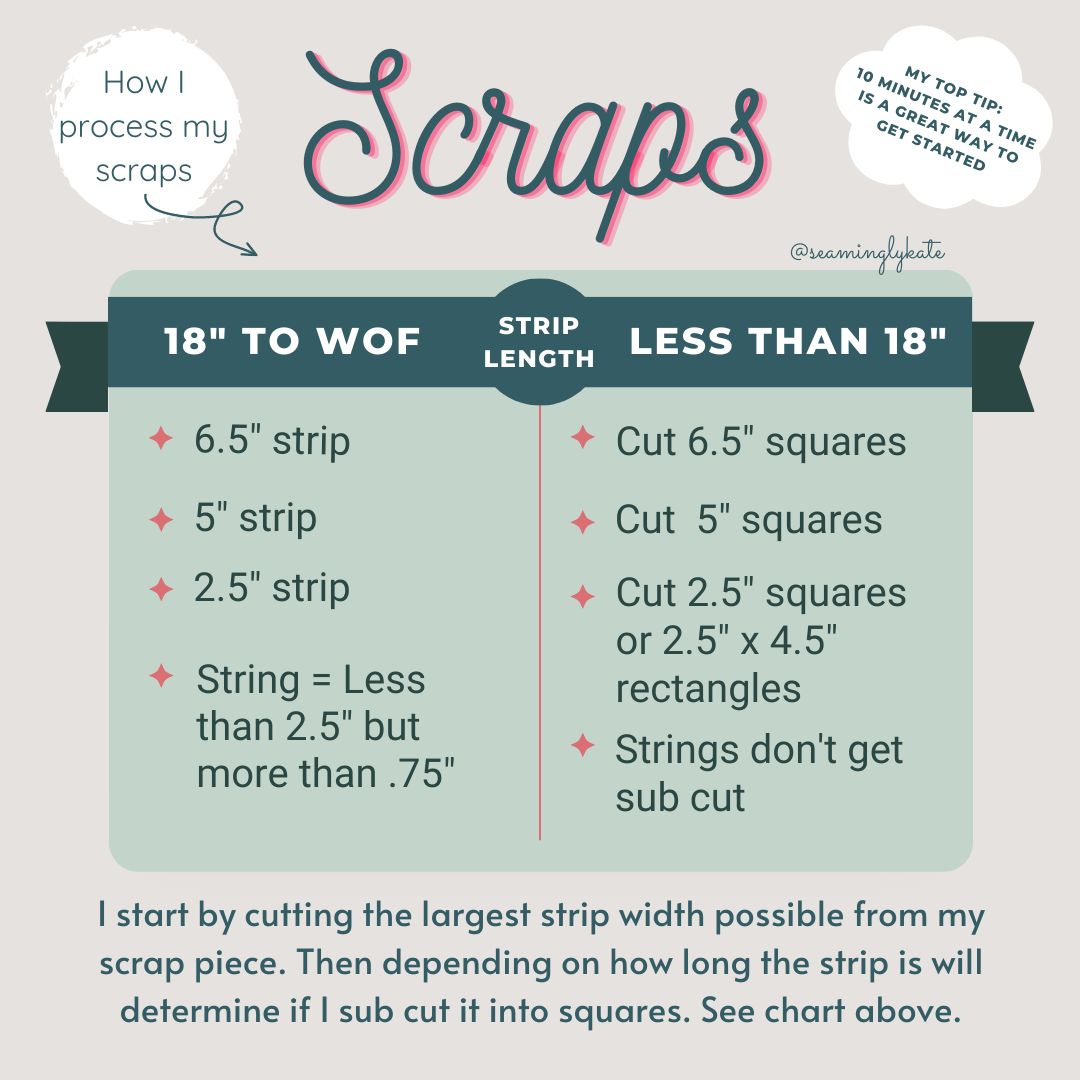
For everything else (the "worker bee" fabrics), grab a fresh blade and cut them into these three versatile sizes:
6.5” strips
5” strips
2.5” strips
If these strips are less than 18” long then they will be cut into squares (my exception to this is that I also enjoy working with 2.5” x 4.5” rectangles).
If the strips are longer than 18” then they stay as strips for now. You can always cut these into squares later if you need more!
Any remaining fabric, from cutting your strip widths above that are less than 2.5” but greater than 1”, get saved as a string.
I created this handy dandy graphic for you to reference:
Once you’ve cut your scraps into these versatile sizes, the next question becomes — where do they all go? Because neatly cut piles can turn into chaos fast without a simple system. In the next post, I’ll walk you through three organizing methods so you can store your scraps in a way that actually makes you want to use them.
👉 Read next: How to organize Quilt Scraps: 3 simple systems that work
Why This Works
When you follow The Usable Scrap Method, you aren’t just organizing fabric — you’re building a ready-to-sew library.
Every strip you cut becomes a future binding, background, block, or border. Every square becomes momentum for your next quilt.
Instead of asking “What should I do with these scraps?” you’ll start thinking,
“Which quilt should I make next?”

I made this quilt from precut 5” and 2 1/2” scrap squares over a year ago
How to Conquer the Mountain (Without Burnout)
If your scrap bin is currently taller than you, don't try to finish it in a day. You'll end up resenting your fabric. Instead:
Set a Timer: Commit to 10–30 minutes a few times a week.
Pair with Entertainment: Put on a podcast or your favorite binge-worthy show.
Stop When the Timer Dings: Seriously. Walk away. This prevents "scrap burnout" and keeps the process fun.

A freshly cut and organized pile of scraps
The goal of The Usable Scrap Method isn’t perfection. It’s usability.
Because fabric you can use is fabric you’ll love — and fabric you love gets sewn into quilts instead of buried in bins.
Tell me in the comments: What is your biggest struggle with scraps? Are you a color-sorter, a bin-tosser, or currently living in fear of a fabric avalanche?
Want a head start? Sign up for my newsletter and get my Portland Quilt Pattern for free—it's designed specifically to use up those 2 1/2” and 5” scraps!
Until next time my fellow scrap wrangler,
Kate